

DeFi?
So, you’re interested in the DeFi space. Trust Wallet. MetaMask. Pancakeswap. Slippage. Confused?? Hopefully, after this article, you’ll have a basic understanding of an exciting new aspect of cryptocurrency.
So what is DeFi? DeFi or De-Fi, stands for Decentralized Finance. Essentially this means that all aspects of DeFi are in YOUR CONTROL. Centralized finance (CeFi/Ce-Fi), the more common aspect of crypto, is exciting but puts most of the control in 3rd party services. Decentralized Finance essentially gives users full control of how their money/assets are allocated. This also leads to DEXs and CEXs. We’ll save that for another article. In this article, we’ll be referencing the Binance Smart Chain which is the blockchain that GlowV2 is running on.
Getting Started
To take the plunge into DeFi, the first thing you need to set up is a wallet. A wallet is how you will check your balances, send/receive tokens and interact with Web3 applications. There are many wallet applications/providers available to you, but most commonly new users prefer Trust Wallet or MetaMask. With that being said, Glow Token LLC has a partnership with Safemoon which just so happens to have its own wallet application with a built-in swap… Whatever wallet you choose, it’s important to know the basics. When first opening your wallet application, you will be prompted to “create a new wallet”. During the wallet creation process, you will be given a 12-word passphrase. This is your “key to the kingdom”. Your 12-word passphrase is singlehandedly, the most important aspect of crypto. Don’t lose it, don’t share it, don’t screenshot it. Protect it at all costs! Write it down and save it in a secure location. Would you give a stranger or friend your bank account information?? Keep this passphrase safe and never share it with anyone unless you trust them COMPLETELY. If you lose your passphrase and need to restore your wallet, you’re left empty-handed.
BNB?
Now that you have a wallet created, it’s time to connect to some DeFi applications and get the ball rolling. Before you can fully experience DeFi, you will need to fund your wallet with coins. There are many exciting projects on multiple chains, but for now, we’ll be focusing on GlowV2 (a Binance Smart Chain BEP-20 native token). BNB is the coin that you will be used to swap for innovative projects like GlowV2, Safemoon, BodaV2, and more. Most wallets offer the ability to buy BNB directly in the application. Once you have purchased BNB (Binance Smart Chain), you’re almost ready to make your first purchase. Trust Wallet has a built-in buy button that allows you to purchase BNB directly in-app with your debit/credit card.
WalletConnect and Swaps
Congratulations! You’re almost done. DeFi can be complicated at first but over time, companies/projects are innovating to make the entry process much more user-friendly. Now that you have BNB in your wallet, you can swap/buy tokens. In order to buy tokens, you need to connect to a Web3 application (commonly referred to as a dApp or decentralized App) known as a Swap. Most commonly, wallets are connected to dApps via WalletConnect. WalletConnect is a feature that links your wallet to a service. It’s important to only connect to dApps that you trust.
The most common swap used for acquiring BSC tokens is PancakeSwap. Below is an image of what your standard connection window looks like when connecting to PancakeSwap and most dApps. In your wallet’s settings menu should be an option to select WalletConnect. On the swap, choose “Connect Wallet”, select WalletConnect and then scan the QR code displayed on your phone with WalletConnect. Make sure that “Binance Smart Chain” is the selected chain for connection.

Swap
After you have successfully connected your wallet, you’re ready to swap. By default, your BNB balance will be shown at the top of the swap, and the token you’re swapping for will be on the bottom. To change the token you’d like to swap for, tap/click the bottom token and enter the contract address of the token. It’s important to only use the official contract address of a token (token projects should have it displayed on their main page). GlowV2’s contract address is: 0x05De1dbFCdc876F790371508b97C337640Dcd6a9
Stay tuned for an article on Smart Contracts and contract addresses. For now, know that the contract address is how you link your wallet to the token’s smart contract on the blockchain.

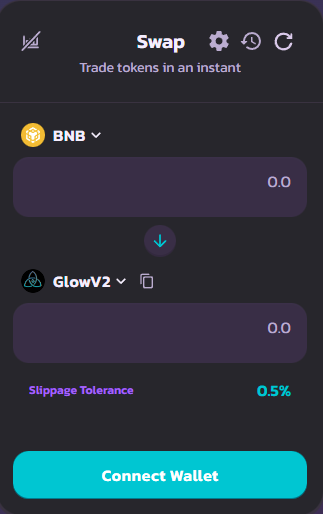
Finally, make sure to set your slippage to the appropriate percentage. Slippage is NOT a tax. When there is a lot of price fluctuation due to market volatility, slippage allows you to complete a purchase if the price differs from the time of the swap to the time the transaction hits the blockchain. At the top of the swap window is a small gear icon. This is where you’ll set your slippage. GlowV2’s slippage is 18%. Typically the slippage is 2-3% higher than the tokens buy/sell tax (if they have one).

Now choose how much of your BNB you would like to spend on purchasing the token and perform the swap. You may need to approve the transaction before completing the swap. This will pop up in your wallet with a confirmation window. There is a very small transaction fee to approve the swap (a few cents) and then you are free to complete the swap. Hit swap, approve the transaction and you now own the token!!
If the token does not immediately appear in your wallet, ensure that you have added the token contract address to your wallet to enable visibility into your token. You can also use the BSC Scan website to validate the delivery of the tokens to your wallet.
Hopefully, all of this information didn’t scare you away. DeFi is an exciting new industry and will only get easier as more innovations are brought to light.
I’ll be updating this article in the future to link to other tutorials and educational articles.


